Need to do,
1 – Render out shadow with alpha for an entire city scene.
2 – Render size is really big like 5,000pix or higher (many times, I need to render out 10,000pix).
3 – Clean shadow edge.
4 – Can't spend a lot of time.
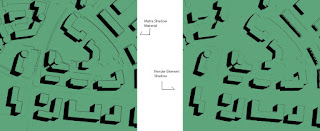
Using a Render Elements, Shadows, is an easy and quick way to get only shadows from a scene but it is not good for a big sized renders because the edges won’t be smooth and clean. If it turns on anti-aliasing, a render time is slow. Also, using a matte shadow material for an entire scene, you will get a blank image because the material can receive a shadow but not cast a shadow. However, we can use a blend shader to resolve this problem.
(I use mental ray for rendering.)
(1)Make a blend shader. (2)The first material is going to be an Arch & Design material and the second material is going to Matte/Shadow/Reflection. Make sure Receive Shadows is turned on. Use Ambient Occlusion and Receive Indirect Illumination options are turned off. The Mask is going to be the Transparency. Input color is white and Transparency color is black. Now, this material works like the render element shadow with cleaner edges.
Go to render setup. (3)Turn on Material Override and drag the material to the slot (use instance) then ren der the scene. I used tiff file format for this. (4)Render preview is black but if click Display Alpha Channel you will see a shadow.
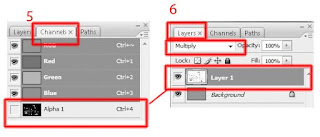
When you bring the image to Photoshop you will see a black image again. The shadow information is under the Channels. (5)Go to Channels tab and select Alpha 1 (shadow). Select all and copy then paste under the lay ers tab. (6) Invert the color (Ctrl + i) then change to a multiply blending mode. You should have nice clean shadows.
Here is a sample image.

(I use mental ray for rendering.)
(1)Make a blend shader. (2)The first material is going to be an Arch & Design material and the second material is going to Matte/Shadow/Reflection. Make sure Receive Shadows is turned on. Use Ambient Occlusion and Receive Indirect Illumination options are turned off. The Mask is going to be the Transparency. Input color is white and Transparency color is black. Now, this material works like the render element shadow with cleaner edges.
Go to render setup. (3)Turn on Material Override and drag the material to the slot (use instance) then ren
 der the scene. I used tiff file format for this. (4)Render preview is black but if click Display Alpha Channel you will see a shadow.
When you bring the image to Photoshop you will see a black image again. The shadow information is under the Channels. (5)Go to Channels tab and select Alpha 1 (shadow). Select all and copy then paste under the lay
 ers tab. (6) Invert the color (Ctrl + i) then change to a multiply blending mode. You should have nice clean shadows.
Here is a sample image.

No comments:
Post a Comment